Wednesday, December 14, 2011

Pinecone Acorn Craft - Pinecone Ski Guys

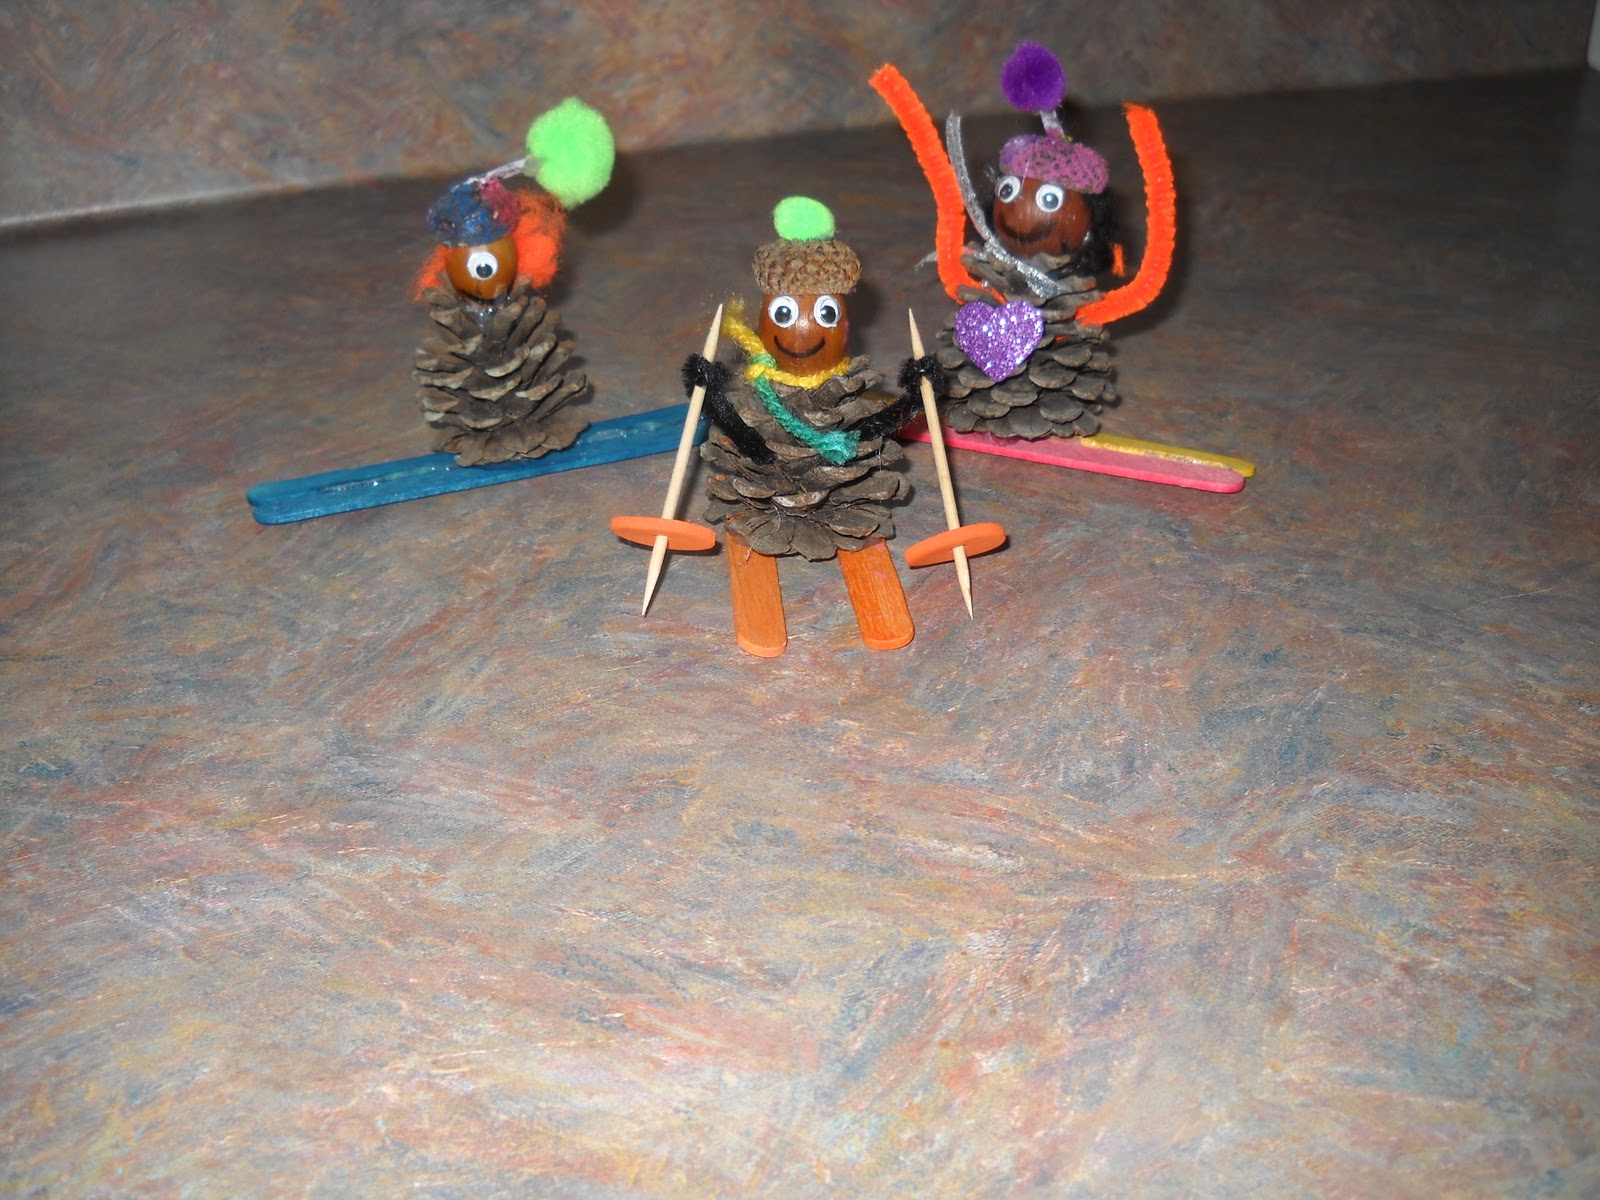
Last month the kids and I were wanting something to do, and we had an abundance of baby pinecones and a bunch of acorns. At first we thought about making acorn pumpkins, but we did that last year. So after a short search online, I ran across a picture of these cute acorn/pinecone winter guys. I ran with that idea and we ended up creating a pinecone skiier, snowboarder, and one cyclops.


Here's how we made our little guys.

Supplies:
 
Scissors
Hot Glue Gun
Paint
Paintbrushes
Pom-poms
Brown paper sacks for work space
Permanent marker
Wiggle eyes
Colored yarn
Popsicle sticks
Toothpicks
Foam shapes
Pipe cleaners
Baby pinecones
Acorns with tops
Any other decorative items you want


Process:

We started by picking out pinecones and acorns. You need to make sure that the top of your acorn fits well so that it's easier to glue. If you want a hat with a pom-pom on top, make sure your acorn top has a stem. I then used scissors to snip the bottoms of the pinecones so they'd sit flat. We then filled the top of the acorn hat with hot glue and stuck it to the acorn head. If you want hair, you will want to put the hair on top of the acorn before sticking the hat on top. We used pulled apart pop-poms for hair.

Once the hat is dry, you can attach the acorn head to the top of the pinecone with hot glue. Hold it until dry. We then attached the pom-poms to our hats and added self-stick googly eyes and drew mouths with black permanent marker. Basically we had what you see above. Then we tied some colored yarn around the necks for scarves, although my daughter used silver sparkle ribbon for hers.

After that, I cut pipe cleaners for the arms and used a little hot glue to hold it inside the pinecone. I tried just wrapping it around but it kept coming out, so you should definitely glue the arms inside the pinecone. The last part was making the skis and snowboards. My kids decided they wanted snowboards instead of skis, so I just hot glued two different colored craft sticks together. Once they dried, I hot glued the pinecones to the craft sticks. Both of my kids painted their acorn hats, and my daughter attached a sparkle heart to hers for a bling-bling shirt. My son's is a cyclops with one eye and no arms and orange hair that some may say resembles Sean White's style.

To make the skis, I just broke a bit off of two craft sticks and glued the pinecone down. I used two circle craft pieces to make the round parts on the skis and just stuck toothpicks through those and wrapped my acorn guy's 'hands' around the sticks. We had a lot of fun making these. You need a good hour or so to make more than one, so this is a great snowy or rainy day craft. Here are the finished products -mine is the skiier, my son's is the Sean White cyclops, and my daughters is the glittery snowboarder with her arms up like "whoo hoo!!" :
http://pinterest.com/pin/create/button/" class="pin-it-button" count-layout="horizontal">

Wednesday, November 30, 2011

A Review of Phonics Pathways - Part One


When we started our 1st grade year in August, I chose Phonics Pathways as our phonics curriculum. The main curriclum we use offers two different programs, but does offer the option to use your own phonics program. After reviewing the samples on the main website at http://www.dorbooks.com/, I thought the program looked like what I wanted. After I struggled so much to teach my son, I really wanted something that covered everything in a systematic way without being stressful.

Phonics Pathways (PP) starts out simply with children learning two letter consonant-vowel sounds. The kids do not start out learning words, and the program actually recommends to avoid reading books until further in the program. I ignored that recommendation though and continued using our BOB books along with PP. After a child learns the two letter blends, there are a few games the author includes to help reinforce the skill. We used the "Train Game", which teaches kids how to put sounds together to form words.

After the two letter blends section, kids start learning how to blend the two letter sounds into three letter words.  About 40 pages into the program your child will be reading short, simple sentences. The author recommends taking as much time as needed to really cement the skills needed, and that's exactly what we've done. While we could have sped through the book , we are only on page 67 out of over 200 pages. Some concepts took more time than others. For example, the two letter blends were fairly easy for her, but once we started combining them into words she needed a little extra practice. We spend anywhere from 2-4 days per page.

Right now we are in the two consonant endings section, and it's taking some time. But I've really seen an improvement in her reading. In the beginning, I wasn't sure if this program was going to work for us since it didn't include its own set of phonics readers or workbooks, but the setup is working and the method used in PP is effective.

While we're only partway through the program, here are some advantages I like:

  • You can reuse the program as your child advances, reinforcing skills and practicing areas where they may still be weak.
  • The program goes with Reading Pathways, which is a great way to reinforce eye tracking skills, fluency, and the skills learned in PP.
  • Phonics Pathways can be used as a spelling program, also. When we studied the /ck/ sound, we used the words from that section as our spelling list. I plan on using it for spelling next year since it teaches phonics rules along with providing plenty of words.
  • You can use any sight word lessons that you want. While the author doesn't encourage mixing the two, I'm a firm believer in kids learning both sight words and phonics for a solid reading foundation so we are using one of Dr. Fry's Instant Word books to practice sight words.
  • I see the advancement in my daughter. While she didn't really understand why she had to learn sounds like /we/and /be/ when those were actually the words we and be, I see her brain working and differentiating between the two when she reads now. Before she would have seen the word 'went' for example, and pronounced it weent, using the word we instead of the sound for the /we/ blend. Now she does not make those mistakes and her fluency has improved.

Here are just a few things that may be a disadvantage:

  • There are no readers or workbooks to accompany Phonics Pathways. To compensate for this, I take what skills we're working on and look for books at the library that use those skills. Originally we used BOB Books, and she was still struggling with a couple of those in August, but now she flies through those so I've shelved them.
  • You can use phonics workbooks, such as Explode the Code 1,
    to reinforce skills and include a workbook into your phonics program. We finished the first book, but upon trying to use the second book I realized that the two programs don't teach the same concepts at the same time. So you either need to teach two different concepts, which I think is detrimental to the Phonics Pathways program, or shelve Explode the Code or any other program until after you've covered the concepts in PP.
Since we're only partway through, these are the only advantages and disadvantages I've come across so far. I think this program works beautifully if you follow the author's recommendations and take your time with the program. The great thing about homeschooling is that we don't have to rush our children through a program just to keep them on par with benchmarks. I think PP is a good phonics program that can take a non-reader or a beginning reader and really give them the basics needed to be a stellar reader by the end of 1st or 2nd grade. I'll  do another Phonics Pathways review once we finish with the program.
    Happy homeschooling! This blog post is linked up over at
    Teach Me Tuesday at Whole Child Creative Curriculum

    Wednesday, November 16, 2011

    Homeschool Freebie of the Month - November Free Ebook

    Sorry for not posting much. I know a lot of you were looking forward to HOD recap's, and those will start up for sure after Christmas. We've put it away for now as we focus solely on math and reading for a variety of reasons. I've just been busy and haven't had much time set aside for blogging about our homeschooling. Anyway, here's the freebie for the month compliments of Old Schoolhouse Magazine and Hameray Publishing. The freebie is a downloadable picture book called Mrs. Wishy Washy and the Big Wash. Suitable for grades K-1, you can save the file to your computer and print it out or just read it from your computer screen. Enjoy!

    Wednesday, October 12, 2011

    Homeschool Freebie of the Month - October

    This month's freebie is the book,No Longer a Slumdog by K.P. Yohannan, founder of Gospel for Asia. This is a great homeschooling resource for those of you who enjoy reading aloud as part of your homeschooling. This book discusses the situations of children in Asia and how the Lord is transforming their lives. This author also offers his book, Revolution in World Missions for free on their website, which would be a great follow-up or precursor to No Longer a Slumdog as it gives the background on K.P. Yohannan's life and covers how he founded Gospel for Asia. Just click on the link above for the order form. My book arrived in about a week. Happy homeschooling!

    Thursday, September 22, 2011

    Our Introduction to Nature Study

    Thursday is science day, and today was our first day of doing a nature study. This is a new concept for us, so I'm not sure if I'm doing it right or not but we had a good time. We spent about 2 hours walking around the forest that borders our neighborhood. We found a ton of cool stuff and made sure to listen, look, and smell all of the things around us during our walk. Since it was an intro, I didn't have her focus on anything in particular but just let her walk around and explore.

    All our goodies.
    We also started a nature notebook using some free journal pages from Handbook of Nature Study and Free Lulu downloads. She filled in part of her mushroom journal page today as we found a handful of white, fuzzy mushrooms on our walk. Below are some pictures from our day:

    Checking out something on the leaves.

    Finding the last of the honeysuckle

    These are little leaves stuck in a huge web


    The mushroom we found peeking out of the ground
    A spider web and egg sac?

    Magnifying the mushroom.

    This moth was fluttering around looking for nectar. I was finally able to keep her still and quiet enough to snap a picture of it.

    Some sort of berry on a tree that we want to research.
    I think this is Goldenrod, but I'm not really sure. It was covered with some sort of flying bugs that were mating all over the place.


    A beautiful flower we need to research and see what it is.
    Enjoying the sweetness of honeysuckle.
    It started sprinkling and she wanted to see if rain tasted like salt water.

    Wednesday, September 21, 2011

    How Our Year Is Going So Far.....

    We are about a month into our Heart of Dakota curriclum, and I'm almost about to set it aside for a bit. While I do like it, I'm finding that I want to focus more on reading, writing, spelling, and math for first grade and not worry too much about science and history. With the way history is woven through the Heart of Dakota curriclum, it would be hard to focus on reading and writing without also doing the history part of the curriclum. I'm not sure if I'll be picking it up again after Christmas, or if I'll just set it aside and use it as-is for second grade.

    So far, here's what we're doing:

    Math - sticking with Singapore. I am going to use flashcards and drill to help cement addition facts.

    Reading - Phonics pathways, explode the code, and a new book I just got, Dr. Fry's 300 most common words which I'm using for reading and spelling instruction. I may pick up the Heart of Dakota spelling list towards the end of the year, but for now I'm finding that using the same reading sight words as her spelling words is helping her retain the information. While she was learning the spelling words provided by HOD, after I'd test her she wouldn't retain how to spell it. With Dr. Fry's book she works all week with the words through a variety of activities.

    We are still using the emerging reader's set from HOD, and we're currently working our way through the Early Reader's Bible.

    Writing - She has a writing journal where I write a prompt and she completes it.

    Science - she loves science. While I decided to scrap the schedule of science provided by HOD because it just jumps around too much, we were still working our way through God's Wonderful Works from the beginning. But my plan is to actually set that aside for now and introduce nature study. We will work on science on Thursdays and continue with nature studies until it gets too cold, and then we'll go back to our science text.

    History - on hold for now

    Electives - karate on Tue., Thurs., and Sat., library on Wed., art on Fri.

    And that's pretty much where we're at with our schooling right now. After the Christmas break, I'll re-evaluate and see if I want to start up BLHFHG again or just use it for second grade.

    Sunday, September 11, 2011

    Fort Benton Civil War Days

    This past weekend was the Civil War period demonstration at Fort Benton. I took Avlyn and a couple of her friends to the event. It takes place in Patterson, MO., which is about an hour from where we live. We had just finished reading Abraham Lincoln by the d'Aulaire's, so being able to see what went on during the Civil War was a great way to connect history to our reading. Below are some pictures of our day.


    Here the girls are learning how Civil War gun cartridges were made. He showed how they rolled up paper, put in the bullets and gunpowder, and then sewed up the top to keep the powder from falling out.

    Here's what it looks like. To load the gun, the soliders untied the yarn and dumped all of the bullets and powder down the chamber. It would shoot the length of a football field.


    Checking out a campsite of the soldiers. The girls touched everything, and the brigade left nothing empty. There was actually tea and coffee in the pots.

    A stagecoach that rode around giving rides or barreling through battles.

    Preparing to fight.

    The preacher tried to make peace between the sides, but the Confederates shot him.

    Then they charged the Union soldiers. You can see a couple of them already going down in the battle.

    This is a cemetary at the bottom of Fort Benton. To the left of the girls is a site where many unkown Union and Confederate soliders' bodies lie. The cemetary is a mix of new and historical grave markers. The girls were very interested in finding graves from the 1800's.

    An undated grave marker of an infant.


    Thursday, September 8, 2011

    Homeschool Freebie of the Month - September

    Freebies are getting harder to find. Maybe it's the cost associated with mailing out free items, or maybe companies just aren't giving away educational products like they used to. This month's freebie is actually a website called Deep Space Sparkle.

    Created and maintained by a first grade art teacher, it provides a number of beautiful art lessons for free. While her step-by-step instruction booklets have a fee, she provides enough photos that you can easily see how a project begins and ends. We are kind of on our own for real art projects this year, as I'm finding our curriculum just doesn't offer the type of art that intrigues my daughter. I fully plan on using some of the free art project ideas from this site. Happy homeschooling!

    Sunday, August 28, 2011

    Our First Week Back and Heart of Dakota Recap

    This last week was our first week 'back to school.' We are using the Heart of Dakota (HOD) curriculum. I'll be honest and say that the first day was a little disappointing. Avlyn just didn't seem that interested, and she especially showed a lack of enthusiasm for both the history read aloud and the poetry. I don't know if it was just back to school blues or a lack of 100% preparation on my part ( we had just gotten back from Florida the week before, so planning for the first day kind of slipped me by), but by Wednesday we seemed to have a good flow, and she seemed to be enjoying the curriculum. This is the first year I'm recording hours, so that was something I was trying to figure out too. I am going to have plenty to blog about this year. Every weekend I plan on posting a recap of our week, since I know other HOD users like to see what other families are doing and how they're implementing the plans. Plus, those not familiar with HOD can see if it's a curriculum they may enjoy. Here's how our week went:

    Math - HOD recommends Singapore math, and that's finally what I decided to go with. This week was basically a review of numbers, number words, and also sequencing up to 10. Friday we started with number bonds, but I'm just learning about those myself and plan on dedicating a post to it soon. I think we will be sticking with Singapore math for the long-term.

    Science - This week we learned a bit about the ocean and whales/dolphins. We did two science experiments. One was creating a current in a sink of water using a dropper and the other was using peanut butter (instead of the suggested Crisco) to simulate the blubber on a whale. She covered two fingers with 'blubber' and dipped both hands into ice cold water. We then discussed why the peanut butter covered fingers weren't cold and how blubber protects ocean creatures from freezing.

    Social Studies - Heart of Dakota is very Christ-centered and very history based. We read quite a few pages out of our history book and created our timeline. We chose to use a large poster board rather than a piece of paper. I have it attached with velcro to the wall for easy removal when it's time to work on it. This is her project completely. I don't write any of the stuff for her. I write the information on an index card and she copies it onto the timeline and then draws a picture representing the event.

    Reading/Language Arts - I am using two things outside of the HOD curriculum, and those are Phonics Pathways and Explode the Code workbooks. We are just continuing with these until reading skills are solidly cemented. We also started the assigned poetry, which was Sara Coleridge's "The Storm." I printed out a poetry sign and also a picture of the author and poem to hang on the wall. Printing the picture was my idea since the poetry is so classic. I thought it would be good for her to relate that the picture was the person who actually wrote the poem. I am having her create a poetry journal also, so that at the end of the year she has all of the poetry she's learned in a nice journal. We are also working on sight words and minor grammar implementaion. This week it was sentences vs. sentence fragments.


    Bible - She worked on Psalm 4:8 this week "I will lie down and sleep in peace. Lord, you alone, keep me safe." We are using an NIV kid's bible for our verses. I am also having her create a Bible verse journal. She writes the verse and then creates an illustration above it. We are just using the writing/drawing journals from Walmart.


    Art - This week she created a shield of faith out of posterboard, tin foil, and paint. She decorated it with a rock, a picture of the Lord, a house, and a few other personal things. This related to another Psalm assigned in our curriculum. She LOVED, LOVED this project.


    Overall, we had a great week. I'm enjoying the flow and material of the curriculum. We're looking forward to a great year. Happy homeschooling!!


    Wednesday, August 24, 2011

    Homeschool Freebie of the Month - August

    Summer is almost over, and most of us are gearing up to start school. We started this week, and I think we're really going to enjoy the Heart of Dakota curriculum. I'm going to post a weekly review on our lessons at the end of each week. This month's freebie comes from Taste of Home and Ziploc. All you need to do is input 2 UPC symbols from any ziploc products and you get a free online back to school meal planner. These look to be quick and easy recipes, including slow cooker recipes, which will come in handy once your schedule becomes full with school projects and lesson planning. Enjoy and happy homeschooling!

    On a side note - Scholastic is having their yearly teacher clearance sale. Homeschoolers can take advantage of the teacher store by simply inputting that you homeschool when you order. I saw some great bilingual science readers for little ones marked down from $20 to $6. I've ordered from Scholastic in the past, and it's always shipped quickly and in good shape. This back to school clearance sale usually runs through the beginning of September, so you may want to check it out.

    Sunday, August 21, 2011

    Back to Homeschool Celebration

    As we prepare to start our new school year tomorrow, I've run across a common question on the message boards. Many parents want to know what to do to make the whole going back to school thing more exciting for a homeschooler. Many kids have a back to school party or get to go clothes and school supply shopping right before school starts. But what does a homeschooled child get to do that makes going back to school fun and exciting? Just because you educate at home doesn't mean that you can't build up anticipation for the first day. For those that school year round, you could choose to have a party or celebration at the conclusion of a large unit or before moving on to a higher math program. Below is a list I've compiled from suggestions and ideas from other homeschooling families, along with what we do to celebrate another year of homeschooling.

    • We have a back to school pizza party the day before and she looks through her books and helps me organize some stuff for the first day. I also take a picture of her on the first day and we compare it to what she looked like the year before on the first day.
    • Bake a cake together the night before and have a cake and ice cream party on the first day. I saw some suggestions that do cake and ice cream for breakfast , while others do it for lunch or after dinner.
    • Write a nice card from you to the kids, sharing your excitement to start a new year.
    • Plan a big breakfast or brunch to celebrate going back to school. You can go out to eat or work together and make a meal at home.
    • Purchase a few new school supplies such as paint, colored pencils, glue, scissors, and colored paper. Kids love seeing a collection of unused school supplies and can't wait to use them.
    • Write down what you need for the year. Create a small list for each child and have them help you shop for the supplies, giving them personal choice on items such as folders, pens, pencils ect...
    • Go on a small field trip the day before or on the first day after all of the work is done. This can be something simple such as a trip to the beach or the park, or you can plan something more elaborate such as the zoo or a museum.
    You can do one thing or many to celebrate the beginning of a new school year. My daughter's personal recommendation for celebrating back to school is to go outside and watch all the kids on the schools busses drive by on their first day of school and then head back home and be glad she doesn't have to get on the school bus. She's a nut! :) No matter what you do, remember to celebrate our freedom of educational choice as many countries are still struggling to gain the right to home educate. Happy homeschooling!

    Wednesday, July 6, 2011

    Homeschool Freebie of the Month - Magazine download

    Have you ever seen or read about a magazine and wondered if it was any good? I know that I have, but I often skip on subscribing unless I can see a sample issue first. Some speciality mags are hard to find at the local bookstore, so I do sometimes wonder if I'm missing out on a really good publication. This month's freebie is from Owl Kids. This company publishes three youth-oriented magazines for kids aged 3-13 and allows you to download an entire issue from each magazine. This is a great way to get an idea of whether or not this would be a good addition to your homeschool. We live in Missouri, so we get a free copy of a MO. nature magazine each month that my daughter really enjoys reading. Enjoy and happy homeschooling!

    Thursday, June 30, 2011

    Building a Homeschool Library

    As Avlyn and I work on cementing phonics concepts this summer, I started thinking about the books I have here at home. I am a self-confessed book addict, but I also like to sell or trade books for new ones. I usually sell at least 30 books in each yard sale we have, if for no other reason than to make room for new books. I hold on to the classics, but I will sell books that my kids outgrow. Unfortunately, I haven't been able to replace books like I used to because I haven't been able to find any good ones at discounted prices. This means that my home library has started to dwindle.

    We are actively working through Phonics Pathways by Dolores G. Hiskes.


    As her phonics skills become more concrete, I want to have a large selection of books available for her to read. Our curriculum for next year came with 8-10 books, but we don't pick up with those until halfway through the year, and the majority of them are a second grade level and not first. One thing I worry about is making sure my kids stay on the level they need to be on for reading. If, for some reason, she needs to go to public school, I don't want her getting put behind simply because her reading level isn't where the school system dictates.

    For that reason, I'm constantly looking for lists or ideas that let me know the best resources to use in our homeschool. I found this web page on leveled book lists. I think this is a great resource for finding age or grade-level appropriate books to build your homeschool library. I may not buy all the books, but I plan on checking out quite a few from the library and have a rotating library this year. If she has a few that she really loves, I'll make sure to buy them and include them in our library.

    If you're unsure how to choose age-appropriate books, here's an idea on how to understand reading levels. Some books make it easy and list the reading level as K-1, 2-3, etc... Others make it a little more difficult by putting decimal numbers on the back or spine of the book. It's not uncommon to go to the library and see a book listed as a 2.4, 1.8 etc.. reading level. When reading these types of levels remember that the first number is the grade level and the second number is the month in that grade level. For example, a book listed as 1.3 reading level is suitable for a child in first grade who has completed the first three months of first grade. Hope this helps some. Happy homeschooling!

    Saturday, June 18, 2011

    Homeschool Freebie of the Month - Urban Bird Watching Kit

    The freebie for June is an Urban Bird Watching Kit sponsored by Cornell Universities Lab of Ornithology. Basically you will need to register with the lab on the website and then request your kit by mail or download the kit from the website. It says you get a couple posters, the data kit for bird watching, a sticker, and a free packet of seeds. The purpose is to provide the data to the lab so they can complete their work and research on urban/city birds. Looks like a fun project. Enjoy and happy homeschooling!

    http://www.birds.cornell.edu/celebration/GettingStarted/kit

    Saturday, June 4, 2011

    How to Save Money on Homeschooling Curriculum

    With this being the first year that we've bought a prepackaged curriculum, I just realized the investment we would be making would require some budgeting. During my research, I saw packages for over $1,000 or for as little as $300. My goal was to see what I could get for $200, the amount I'd probably spend on school clothes for the year.

    I knew that I needed reading, math, language arts, spelling, handwriting, phonics, history, and science as the core for first grade. Since Avlyn will be 7 in December, I will need to keep a record book and portfolio of her work that covers the basic subjects. I researched, read, looked at samples, prayed, and finally decided on what to get. If I purchased everything direct from the publisher I would spend around $465.00 But by looking at used curriculum and discount sites I spent exactly $245.56, over $200 less than buying from the publisher and not much more than what I was hoping to spend. Here's a breakdown of what I did, all paid prices include my shipping costs, too:


    We decided to go with the Heart of Dakota curriculum. This curriculum is Christ-centered and offers everything needed for a full year. While I like most of their choices, there were some things I wanted to change. If I had purchased the entire curriculum from HOD, it would have cost me $305 - still very affordable, but even more over my budget than necessary. Also, I didn't need some of the elements in the package and didn't want one of the choices included. So I was off to mix and match and save.


    Heart of Dakota - I purchased the economy package and added the science text for $121.37. This gave us all of our history, science, and the teacher manual which is definitely worth the money. The publisher recommended a certain emerging reader set that they sell for $65.33. I went on Amazon and searched for every title. I found every book for a reduced price and most were available for free shipping, making my emerging reader set $43.36  The curriculum also requires read aloud books in certain genres throughout the year. I chose not to purchase any of those and just waited for my teacher guide to arrive. When it did, I found the book list in the back and noted that at least one title from each genre is available at our library. Since these take a couple of weeks to go through, it's not really necessary to have all of them available when school starts for us. The company sells those books for around $50, our cost $0.00.


    The next step was to find our math. HOD offers Singapore Math as the option. After much prayer and research, I chose to go ahead with Singapore over Horizons math. Now I could have purchased the workbooks needed directly from HOD, but they don't offer a reduced price on it unless I buy the entire package, which I wasn't doing. Now the HOD curricula only recommends the workbooks for first grade, but being that I'm new to Singapore Math and teaching math in a different way than I learned, I really wanted the textbooks and home instructor's guides that are available. So I was able to find both textbooks and the first home instructor's guide on Ebay for $23.00. I purchased the two workbooks from Christian Book Distributors for 20.97, making my math curriculum a total of $43.97. Had I purchased it all directly from Singapore, I would have spent around $70. I am waiting to see if I need the 2nd instructor's guide before purchasing it.


    I wanted to get A Reason for Handwriting as our main writing curriculum. HOD does offer copywork as their handwriting program, but I thought A Reason For fit my daughter better. We will probably do HOD copywork the second half of the year. From the publisher the workbook is around $15. I went on ebay and got the workbook and the teacher guide good for K-6th grade for $12. If I had purchased both of those from the publisher it would have been $47.50.


    We still need to work on phonics next  year and I've chosen Phonics Pathways. The 10th edition just came out and the publisher wants $40.65. I went on Amazon again and found the new edition for $24.86.


    Price Breakdown:


    Heart of Dakota  original price of wanted items: 241.76     paid price for wanted items: 121.37

    Singapore Math   original price: 69.60     paid price: 43.97

    Emerging Reader books   original price: 65.33    paid price: 43.36

    A Reason for Handwriting   original price: 47.50    paid price: 12.00

    Phonics Pathways 10th ed.   original price: 40.65    paid price: 24.86


    Original Pricing Total: 464.84    Discount pricing total: 245.56

    Total Savings: 219.28

    I could have saved even more money had I been patient enough to wait for our particular curriculum from HOD to go on sale through the message board. I've seen the teacher guide on sale for pretty cheap, but I was eager to get my hands on it, and I do like to support the publisher somewhat for all their hardwork in creation of the curriculum. Hope this breakdown helps you see how I managed to save over $200 and still get everything I needed for first grade. Happy homeschooling!

    How to Choose a Homeschool Curriculum

    Summer is a busy time for homeschoolers. While most kids are enjoying their summer break from school, homeschool families are busy planning for next year. I have always created my own curriculum for kindergarten homeschooling. The only purchases I made that would probably be considered curriculum were Bob Books and Scholastic Sight Word readers. Other than that, I mainly used free printables and games to teach math and reading. Science has always been a hands-on, let's explore the world around us, venture in kindergarten. But since this is the first time we will be moving beyond kindergarten and homeschooling for first grade, I've decided to make it easier on myself by purchasing a curriculum.

    Oh my gosh, is homeschool curriculum shopping overwhelming. First, there is a number of companies that publish curricula. Second, it all looks so good. While I was shopping, I figured that there were probably some newbies who could use some help when it came time to choose a curriculum. Here's some tips that came to me while I was researching and purchasing curriculum:

    • Give yourself plenty of time to research. I started requesting print catalogs last month. Some companies only offer their choices online, but many of the popular curriculums such as Sonlight, Alpha Omega, ApologiaChristian Liberty Press and Heart of Dakota still offer print catalogs. I much prefer a print catalog to an online catalog, because I like to peruse it over and over while just hanging out. Give yourself time to get each catalog and look them over before ordering.

    • Create a list of what you want out of a curriclum. Do you want a Christ-centered curriclum, one that offers everything in one big package, one that pieces together a curriculum using resources from a variety of publishers, or one that you can combine for students close in age? Once you know what you want your curriculum to provide, it makes the decision easier.

    • Read plenty of online reviews. The site Homeschool Reviews is a great place to view the different curriculums and read user reviews. See what the main complaints are and decide if that affects you. For example, one curriculum I viewed had a lot of the same complaint - that it was too time consuming and required too much planning. I am not afraid of a little planning and preparation, so I chose to not view that as a negative of the curriculum. On the other hand, another curriculum review stated that it jumped around too much and kids lost interest after a few weeks - that I took as a negative.

    • Don't be afraid to mix and match. While many homeschool publishing companies offer full packages, it's okay to mix your math, reading, language arts, spelling, handwriting, and science among different publishers. For example, we are using Heart of Dakota for much of our curriculum, but I'm using Phonics Pathways and a Reason for Handwriting instead of what the company offers in those areas.

    • Look at different curricula if you can. Visit a convention or see if a homeschooling friend has curriculum you can look at. A friend of mine let me look at her collection, and it was very helpful.
    These are just some tips and ideas for choosing a curriculum. Your main concern should be choosing a curriculum that will interest your child and doesn't frustrate them with too complicated concepts. Happy Homeschooling!

    Monday, May 30, 2011

    Homeschool Freebie of the Month - Bible Bookmarks

    I'm going to start adding one freebie a month. It may be something useful or fun for your homeschool or family. For the month of May the free homeschool item is three bible bookmarks from Bible Bookmarks. These are just a sampling of what the company offers. These bookmarks discuss a certain aspect of the bible and include verses for each day of the week, including questions. The order form mentions billing and shipping costs, but just fill it out and check the bottom box that says it's a free sample at no charge. Enjoy and happy homeschooling!

    http://www.biblebookmarks.com/Free-Samples_p_19.html

    Monday, May 16, 2011

    May Is Planting Month

    Sorry for the neglect of the blog. April was a trying month for us, and I just didn't feel like blogging. But all is not lost. We did a lot of planting experiments in April, and I made sure to take pictures of the processes so I could share them with you. To finish up our kindergarten science, I focused on different types of experimental plantings. While they may not be the first time something's been planted, they were the first time we had ever planted anything that way, so it was a learning experiment for us. This week I'll post about our potato plant, our garlic, and our scallions. I'll also share our hay bale garden with you. Avlyn has had a great time doing all of these planting activities. She especially enjoys watching the scallions grow a little bit more each day. If you've never planted something with your child, now is the time to start. It's a great learning experience, and it's fun!  Happy homeschooling!

    Wednesday, March 23, 2011

    How to Make a Leprechaun Trap

    This post is a little late because I've been having some health issues that just haven't left me feeling up to blogging very much. But better late than never, right? This year, Avlyn and I made a leprechaun trap. There was a photo of something similar in Family Fun magazine, so I just winged it for our project. The idea is to create a trap that will entice a leprechaun on St. Patrick's Day eve. But we all know that leprechauns are tricky little buggers, so it's almost impossible to catch one. But you also need to understand that my daughter believes 100% that she will catch one eventually, and there's no telling her they're just a make-believe creature.

    We started by cleaning out a bread crumbs container. Then she decorated a piece of green construction paper. I used hot glue to wrap and attach the piece of construction paper to the container. You could use regular glue, but it will take longer to dry.


    Then she stuffed some gold tissue paper down inside to "trick" the leprechaun into thinking that the container was filled with gold, because we all know what leprechauns love - GOLD! After attaching the paper to the container, she added green and gold stick on gems and yellow flowers picked from our forsythia bush.


    While she was busy doing that, I created a ladder for the leprechaun to use to climb up into our container for the fake gold. I just cut small tree branches to size and hot glued the pieces together. Then I added some yellow forsythia flowers. We then created a sign to attract the leprechaun by advertising our leprechaun gold.


    It took her a while to find just the right spot in our home for the leprechaun trap. After she did, we added some baby gummi bears because we heard leprechauns have a sweet tooth. When we woke up the next morning, our trap was sans leprechaun but the gummi bears were gone and he had dropped some Skittles behind-----because you know they like to taste the rainbow ;)

    I hope you like this craft and have fun making one of your own next St. Patrick's Day. Happy homeschooling.

    Friday, March 4, 2011

    Kindergarten Dinosaur Activities

    There are a ton of dinosaur activities available for homeschooling but too much can be a little bit of overkill on the theme, so we just stuck with doing a couple of dinosaur activities. We started by reading lots and lots of books. Most libraries will have a large selection of dinosaur books, and that's where we found all sorts of stories. Some were fun stories like "Dinosaur Vs. Bedtime," while others were more educational books that described the dinosaurs, what they ate, and how they lived. Just visit your local library and see what they have available.

    While reading, we talked about how some dinosaurs were plant eaters and some were meat eaters. We learned how to tell the difference between the two and played a little game called, "What Would They Eat?" where we went through the books and guessed what they may have eaten and why we thought that.

    Then we talked about fossils and how paleontologists look for fossils and bones to help recreate dinosaurs and the environment that existed when they were alive. To reinforce this idea, I purchased a dinosaur egg from the dollar store. This is a rock like egg that comes with a brush and stick for breaking the rock away and finding the dinosaur bones that are buried inside. You then have to put your dinosaur together using the joints of the pieces. Unfortunately, our plastic eating dinosaur puppy (ironically named Bones,) ate our little dinosaur before we could take a picture of him all put together.


    After being paleontologists for the day, we decided to create a brontosaurus from paper plates, an idea I got from the book Paper Plate Crafts.

    Basically you fold a couple of paper plates in half, making sure the bottom is flat and rectangular. Next, staple the top together leaving the sides open for the head and tail. Then, using another paper plate, cut a long arch shape for the head and a long pointier shape for the tail. Staple these pieces to the inside of the plate on each end. Now color or paint it, and you have a brontosaurus. The original directions called for legs, but we could never get ours to really stand up on them, so we just left the bottom flat. And this is what we did when we spent 3 days on dinosaurs.


    Tuesday, February 8, 2011

    Flat Stanley Project for Kindergartners


    Last month Avlyn and I embarked on a geography project using an idea from the book Flat Stanley. If you're not familiar with the book, it's a story of boy named Stanley who ends up getting flattened by a bulletin board while he's sleeping. He's able to do all sorts of fun things like become a kite and fly and go down into a sewer to help his mom locate her lost ring. One thing he's also able to do is be put into an envelope and mailed to a friend. This is the basis for the Flat Stanley Project. There are ideas floating all over the Internet about how different people and schools do this project. The official website is The Official Flat Stanley Project. This site has teaching ideas and templates for the Flat Stanley character.

    Here's what we're doing (after reading the book):

    1. We invited another homeschooling family to join us, and the kids got together one day to create their Flat Stanley's. In our project we are calling them by the kids' names, so it's a Flat Avlyn and a Flat Alexander.

    2. While the official website has templates, I downloaded and printed out a blank template from First Palette. This template is plain, no clothes or features, so the kids could get really creative. Here's an example of my Flat Rhyah that I made to give the kids an idea of what they were supposed to do.

    3. We got out a copy of a U.S. map and showed the kids where we lived and then showed them how far they would travel to their first destination. We sent Avlyn to Florida, and I believe Alexander was headed to California. We then decided on the number of people we wanted it sent to. We decided that 7 was a good number, and would probably get us the flat kids back within a couple of months.

    4. I created a packet of information to be shipped along with Flat Avlyn to each destination. It included an intro letter, an information sheet, and a sign-out sheet. The intro letter basically describes the project and what each person is supposed to do. I asked that they keep her no more than 4 days and then mail her on to a person of their choice. I included an email address for people to email us pictures of things they do with Flat Avlyn while she's visiting.

    The information sheets are numbered 1-7 and have a few questions people can answer if they want. I asked them to put where Flat Avlyn is, state and city, what's special about where she's visiting, and what she did while she was there. The end of the packet has a sign in sheet for each person to sign their name. The information sheets are numbered so we'll know which person goes with which information sheet.

    5. We mailed them off.

    6. Sit and wait. Now it's just up to other people to help us out. One of her grandmothers was the first destination, and she's been giving me updates. So far Flat Avlyn has been to the beach, the library, the grocery store, and yesterday she visited a fire station and took a picture with all of the firemen.

    As you can see, this project can be extremely fun if the chosen participants are eager to help you out. Between the two kids, they should go 14 places. If you're working with a large group or have a large family you could choose just one recipient for each person, but since we're small we needed to increase the number of recipients. We're excited to see where our flat children will go and what they'll do. This project will also integrate a lesson about the mail system and how mail is delivered around the world. I'll post an update whenever we get them both back. Happy homeschooling!